I've been wanting to see how many times I can do pull ups with 25% of my body weight attached to me so over the weekend I tried it out. I managed almost 5 pull ups, not in the most perfect form, but I was pretty proud of myself so I thought I'd just share it.
Monday, November 19, 2012
Strength Training Week 7 Update!
I'm back again on week 7 of my 12 week get fitter, lose some weight, challenge myself program and since my last update I've come up with a few more goals. I don't know if I'll reach some of these by the end of the 12 weeks but I will certainly try my best to progress.
When I last left you, I had managed to complete 20 chin ups and set a goal to master at least 1 muscle up. I'm still working on that and get a little closer every week. However, the new challenges I've set for myself are:
1) muscle up
2) plyometric pull ups (lower bar to top bar)
3) dumbell press my own body weight (currently weigh 41kg and aiming to lose 1kg and bench 40kg)
4) squat my own boday weight (currently weigh 41kg and aiming to lose 1kg and squat 40kg)
Well, I've managed some narrow to wide grip plyometric pull ups and managed my first lower to upper bar plyometric pull ups the other day but only a hand full and they scared me. I think it's just the fear of not being able to catch the top bar and falling off my step box. You can check out my narrow to wide grip plyos in the video below.
As for dumbell presses, I'm benching 16kg x 2 dumbells (6 reps). With dumbells at my gym going up in increments of 2kg, I'm just 2 dumbell weights away from benching my own body weight.
And finally, I've managed to squat 30kgs (8 reps). I have been experiencing knee problems for years and people always say you shouldn't squat with your knees past your toes, but I've been doing squats with my trainer the Polliquin way, all the way down, knees past the toes and my knees have never felt better. I'm not going to go into detail about why it's better because frankly, I'm not 100% clear on the explanation but if you want to find out more, you can google Charles Polliquin.
I am at the gym 5 to 6 days a week. I'm doing 3 days of bartendaz class, 1 day of leg training with weights including 30 to 40 min of muscle up practice, 1 day of upper body training with weights and 1 day of hula hoop.
So, I am doing 5 days of intensive training with 1 day of rest and 1 day of something fun and low intensity. I know it sounds like a lot but my muscles do get a rest 2 days a week and on Tuesday, my first day of bartendaz in the week, I feel rested and usually stronger than the last week.
As I mentioned before, I have a personal trainer who has been helping me with my knee rehab. We've been doing only legs for months but now, he's added upper body to my program in order to help me get stronger for my muscle ups.
My current upper body workout involves:
1) Weighted pull ups - 1 count up, 3 counts down and dead hang for 1 second (4-6 reps with 8.5kg this week)
2) Dumbell press (6 reps with 16kg x 2 this week). We've been doing these because the dip bars at the gym are very wide and although I can do weighted dips, the width of the bar puts a lot of strain on my shoulders as I have a very narrow frame.
3) Zottoman bicep curls (6 reps with 4 kg dumbells)
4) Tricep extensions (6 reps with 4 kg dumbells)
5) Seated cable row
I haven't dropped another kilo since my last update but to be honest I've been having a lot of difficulty in the last two weeks sticking to the low carb diet. I was hungry all the time last week and filling up on carbs, only to realize this week it's probably because I'm so bored of chicken breast...which I never really liked to begin with but eat all the time in my salad for lunch because its cheap and my husband likes it. And...because of this dislike for chicken breast, I haven't been putting enough in my lunch and therefore end up feeling super hungry because I'm not getting enough protein to fill my stomach. So, this week, I'm back on track with my salad topped up with smoked mackerel and mixed seafood. It's a bit pricey but not as pricey as running off to Pret for a couple sandwiches that don't even keep me full for long. I guess that would be my one tip for anyone trying not to overeat. When you're hungry, don't snack on cookies, biscuits or any other kind of carbs. Have more protein as it stays in your stomach longer and keeps you feeling full for longer.
In addition to that, I think I've developed some kind of mild elbow tendonitis. I may get it checked out, but so far, 2 days of rest a week, tennis ball massages, some NSAID and ice have been working and as far as I know, this seems to be very common with people who train in bartendaz or crossfit.
Anyway, that's the update for now. Check out my narrow to wide grip plyometric pull ups below.
When I last left you, I had managed to complete 20 chin ups and set a goal to master at least 1 muscle up. I'm still working on that and get a little closer every week. However, the new challenges I've set for myself are:
1) muscle up
2) plyometric pull ups (lower bar to top bar)
3) dumbell press my own body weight (currently weigh 41kg and aiming to lose 1kg and bench 40kg)
4) squat my own boday weight (currently weigh 41kg and aiming to lose 1kg and squat 40kg)
Where am I right now?
Well, I've managed some narrow to wide grip plyometric pull ups and managed my first lower to upper bar plyometric pull ups the other day but only a hand full and they scared me. I think it's just the fear of not being able to catch the top bar and falling off my step box. You can check out my narrow to wide grip plyos in the video below.
As for dumbell presses, I'm benching 16kg x 2 dumbells (6 reps). With dumbells at my gym going up in increments of 2kg, I'm just 2 dumbell weights away from benching my own body weight.
And finally, I've managed to squat 30kgs (8 reps). I have been experiencing knee problems for years and people always say you shouldn't squat with your knees past your toes, but I've been doing squats with my trainer the Polliquin way, all the way down, knees past the toes and my knees have never felt better. I'm not going to go into detail about why it's better because frankly, I'm not 100% clear on the explanation but if you want to find out more, you can google Charles Polliquin.
My training:
I am at the gym 5 to 6 days a week. I'm doing 3 days of bartendaz class, 1 day of leg training with weights including 30 to 40 min of muscle up practice, 1 day of upper body training with weights and 1 day of hula hoop.
So, I am doing 5 days of intensive training with 1 day of rest and 1 day of something fun and low intensity. I know it sounds like a lot but my muscles do get a rest 2 days a week and on Tuesday, my first day of bartendaz in the week, I feel rested and usually stronger than the last week.
As I mentioned before, I have a personal trainer who has been helping me with my knee rehab. We've been doing only legs for months but now, he's added upper body to my program in order to help me get stronger for my muscle ups.
My current upper body workout involves:
1) Weighted pull ups - 1 count up, 3 counts down and dead hang for 1 second (4-6 reps with 8.5kg this week)
2) Dumbell press (6 reps with 16kg x 2 this week). We've been doing these because the dip bars at the gym are very wide and although I can do weighted dips, the width of the bar puts a lot of strain on my shoulders as I have a very narrow frame.
3) Zottoman bicep curls (6 reps with 4 kg dumbells)
4) Tricep extensions (6 reps with 4 kg dumbells)
5) Seated cable row
Thoughts for the week:
I haven't dropped another kilo since my last update but to be honest I've been having a lot of difficulty in the last two weeks sticking to the low carb diet. I was hungry all the time last week and filling up on carbs, only to realize this week it's probably because I'm so bored of chicken breast...which I never really liked to begin with but eat all the time in my salad for lunch because its cheap and my husband likes it. And...because of this dislike for chicken breast, I haven't been putting enough in my lunch and therefore end up feeling super hungry because I'm not getting enough protein to fill my stomach. So, this week, I'm back on track with my salad topped up with smoked mackerel and mixed seafood. It's a bit pricey but not as pricey as running off to Pret for a couple sandwiches that don't even keep me full for long. I guess that would be my one tip for anyone trying not to overeat. When you're hungry, don't snack on cookies, biscuits or any other kind of carbs. Have more protein as it stays in your stomach longer and keeps you feeling full for longer.
In addition to that, I think I've developed some kind of mild elbow tendonitis. I may get it checked out, but so far, 2 days of rest a week, tennis ball massages, some NSAID and ice have been working and as far as I know, this seems to be very common with people who train in bartendaz or crossfit.
Anyway, that's the update for now. Check out my narrow to wide grip plyometric pull ups below.
Wednesday, November 14, 2012
Glitter Nail Art!!
For the last two weeks I went with some glitter. Well, for the last week I had a dark blue nail polish on, but on Thursday night at the gym had a friend put some glitter nail polish on top of it. It inspired me to do another glitter nail art look this week.


Saturday, October 27, 2012
Halloween Nail Art!!
Last week I mentioned that I was going to fix my Pink Stripes and Polka Dot nails once I received my striping tap. Well, I didn't end up doing that yet but just wanted to show you how I fixed that look for the week.
In the spirit of Halloween and since I'm just a beginner at nail art, I've decided to go with an easy white ghost nail art using my dotting tool!!

 |
| I took this pic today before removing the polish so it's already pretty chipped. Sorry about that!!! |

Week 4 Fitness Program Update!
I've just reached the week 4 milestone of this 12 week "program" I've created for myself which if you weren't following from the beginning is basically a 12 week goal I've set for myself to work out 5 days a week, follow a healthy low-carb diet, get stronger and feel better overall. So here is the update on what has happened over the last 4 weeks.
So, to recap the last 4 weeks, I've pretty much followed my meal plan about 80% to 90% of the time. As you may recall, at the end of week 1 I went to a wedding and had loads of yummy food. I had done well up until that day and what was supposed to be a cheat meal ended up being a cheat day. Mondays to Fridays of the last 4 weeks have been good. I allow myself my much needed Sushi or Japanese bento lunch once a week and the rest of the days I have my usual chicken salad. As for snacks, I've been sticking to nuts strictly but allowed myself some Aero Mint chocolate this week.
Now, I have to tell you about last weekend's dinner. We had some friends over on Saturday night and one of our friends is vegetarian. Because I don't really know how to cook vegetarian meals my husband and I decided to order from a nice little local Indian restaurant down the street from us. It was Northern Indian food which for us non vegetarians included some creamy butter chicken, lamb cooked in creamy yogurt sauce, briyani, naan bread and a few other dishes. Dessert was a chocolate tart from Waitrose which after everyone left I ate another 2 pieces making my dessert count for the night 3 quarters of a personal pizza sized tart!!! I just couldn't help myself.
During this week, I also treated myself to a few little Parisian "twinkies" which my colleague brought for me from Paris. I know this all sounds like a lot but if you look at all the good meals and snacks I ate, the bad ones really only accounted for about 10% of my meals and snacks. The reason I'm pointing this out is because for those of you out there who feel guilty when you do allow yourself some treats like this, you shouldn't feel guilty. It's an awful and unhealthy mental cycle and as long as you're doing good most of the time, you should focus on that and not let yourself feel bad.
The first 2 weeks I managed to get to the gym 4 days but the last 2 weeks were 6 day gym days. As usual it was 3 days of Bartendaz, one day of leg training alone or with my trainer and for the last two weeks I started taking Hula Hoop class. It's offered at my gym and is just a super fun and surprisingly challenging workout. I did about 30 minutes of cardio before the Hula Hoop classes but that's about all the cardio I do. I'm pretty happy how well I've kept up!!
At the beginning of all this I mentioned I wanted to be able to do 20 chin ups and didn't think it would happen in 12 weeks but that I would keep trying. Well, some of you may have seen the video and surprisingly I reached the 20 goal already. I didn't think it would happen that quickly but it did and my new goal is to be able to accomplish a muscle up!!! This is incredibly hard and realistically speaking it could take months and months but I am working towards that right now. I've started training Bartendaz with 3kg ankle weights and hope to increase that slowly in order to get stronger.
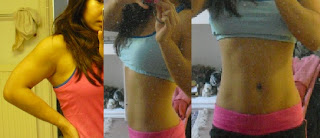
Everyone always says that the diet and workouts go hand in hand and if you stick to both you will see results. I don't measure myself but in terms of weight, I have gone down 1kg in the last 4 weeks. Considering I don't do cardio I strongly believe none of that weight was muscle but more likely a combination of fat and water!!!
Here's some updated photos!! I think 4 weeks have made some sort of difference and I believe it's just a matter of commitment to see results!!
Diet Update:
So, to recap the last 4 weeks, I've pretty much followed my meal plan about 80% to 90% of the time. As you may recall, at the end of week 1 I went to a wedding and had loads of yummy food. I had done well up until that day and what was supposed to be a cheat meal ended up being a cheat day. Mondays to Fridays of the last 4 weeks have been good. I allow myself my much needed Sushi or Japanese bento lunch once a week and the rest of the days I have my usual chicken salad. As for snacks, I've been sticking to nuts strictly but allowed myself some Aero Mint chocolate this week.
Now, I have to tell you about last weekend's dinner. We had some friends over on Saturday night and one of our friends is vegetarian. Because I don't really know how to cook vegetarian meals my husband and I decided to order from a nice little local Indian restaurant down the street from us. It was Northern Indian food which for us non vegetarians included some creamy butter chicken, lamb cooked in creamy yogurt sauce, briyani, naan bread and a few other dishes. Dessert was a chocolate tart from Waitrose which after everyone left I ate another 2 pieces making my dessert count for the night 3 quarters of a personal pizza sized tart!!! I just couldn't help myself.
During this week, I also treated myself to a few little Parisian "twinkies" which my colleague brought for me from Paris. I know this all sounds like a lot but if you look at all the good meals and snacks I ate, the bad ones really only accounted for about 10% of my meals and snacks. The reason I'm pointing this out is because for those of you out there who feel guilty when you do allow yourself some treats like this, you shouldn't feel guilty. It's an awful and unhealthy mental cycle and as long as you're doing good most of the time, you should focus on that and not let yourself feel bad.
Workout Update:
The first 2 weeks I managed to get to the gym 4 days but the last 2 weeks were 6 day gym days. As usual it was 3 days of Bartendaz, one day of leg training alone or with my trainer and for the last two weeks I started taking Hula Hoop class. It's offered at my gym and is just a super fun and surprisingly challenging workout. I did about 30 minutes of cardio before the Hula Hoop classes but that's about all the cardio I do. I'm pretty happy how well I've kept up!!
Strength Update:
At the beginning of all this I mentioned I wanted to be able to do 20 chin ups and didn't think it would happen in 12 weeks but that I would keep trying. Well, some of you may have seen the video and surprisingly I reached the 20 goal already. I didn't think it would happen that quickly but it did and my new goal is to be able to accomplish a muscle up!!! This is incredibly hard and realistically speaking it could take months and months but I am working towards that right now. I've started training Bartendaz with 3kg ankle weights and hope to increase that slowly in order to get stronger.
Weight & Body Update:
Everyone always says that the diet and workouts go hand in hand and if you stick to both you will see results. I don't measure myself but in terms of weight, I have gone down 1kg in the last 4 weeks. Considering I don't do cardio I strongly believe none of that weight was muscle but more likely a combination of fat and water!!!
Here's some updated photos!! I think 4 weeks have made some sort of difference and I believe it's just a matter of commitment to see results!!

Saturday, October 20, 2012
Pink Stripes and Polka Dot Nail Art!
I did freehand stripes for this look but it's really hard to keep the lines straight. Next week I will redo this look using my newly ordered striping tape to show you how much more professional and perfect stripes can be with this look. But for now...here it is!!!


Friday, October 19, 2012
What You May Not Know About SUGAR!!!!
I love dessert and even when I'm on my 12 week low-carb diet I find it hard not to have a cheat meal every week or two that consists of dessert. I've always found information and documentaries on nutrition really interesting and over the last few years have started to get the idea that sugar is the devil!! It's worse than fat and it's probably the cause of all the obesity related diseases out there in the world. Having said all that, I do find it hard not to have dessert every now and then!
Many of you may not realize it but sugar in the form of fructose is found in all processed foods and it reacts in your body just like alcohol does. So, if you're a pregnant or breastfeeding mom, a parent who lectures their kids against drinking alcohol, someone who grabs the low fat food (which often has a crazy amount of sugar), someone who thinks that natural sugar alternatives like agave is okay for you or someone who has just never really given the negative effects of sugar much thought, this is a good video to watch!!
Many of you may not realize it but sugar in the form of fructose is found in all processed foods and it reacts in your body just like alcohol does. So, if you're a pregnant or breastfeeding mom, a parent who lectures their kids against drinking alcohol, someone who grabs the low fat food (which often has a crazy amount of sugar), someone who thinks that natural sugar alternatives like agave is okay for you or someone who has just never really given the negative effects of sugar much thought, this is a good video to watch!!
Monday, October 15, 2012
Revlon Colorstay Foundation for Oily/Combination Skin!!!
I'm jumping up and down for joy right now!!! I CAN'T BELIEVE I NEVER KNEW ABOUT REVLON COLORSTAY FOUNDATION FOR OILY/COMBINATION SKIN!!!
This foundation has been around forever and ever and ever. When I say forever, I mean it's been around since I was a teenager and all this while I have been searching for the perfect foundation for my incredibly oily skin!!!
Nowadays, it's all about illuminating foundations so a super matte foundation is hard to find. I started to google and read reviews about foundations that work well with oily skin and this came with top reviews. It's a pharmacy brand and in the UK only costs around £12. It's probably even cheaper in the US but it works like no other expensive foundation has ever worked for me. I've been using MAC Studio Fix Fluid for years together with the Studio Fix Powder and that worked well. I only had to blot a handful of times a day. I thought for years that was as good as it was going to get, but as you can see from my excitement, I was wrong!!
So let's go through the pros and cons of this product!!

Ivory: NW15/ NC15 lightest
Buff: NC20 best match for fair NCs
Sand Beige: NC20-25 somewhat neutral undertones
Nude: NC25 peachy undertones, definitely not for pinks or true golden
Natural Beige: NW20 tends to run pink
Medium Beige: NC27 between Sand Beige and Golden Beige
Fresh Beige: NW25 pinky undertones
Golden Beige: NC30 truest yellow/olive undertones
Warm Golden: NW30/NC30 somewhat neutral undertones
True Beige: NW30 pinky undertones (for Fresh Beige in summer)
Natural Tan: NC40/NC42 more neutral than golden caramel
Early Tan: NW35 somewhat peach undertones
Rich Tan: NW35 pinkish undertones
Golden Caramel: NC40/NC42 more golden than natural tan
Toast: NW43/NC45 neutral undertones
Rich Ginger: NW45 very peachy-pink
Caramel: NC45 seems to run true to color
Cappucino: NC50 slightly more peach than Caramel
Mahogany: NW50/NC55 the darkest of NWs but not extremely peachy
Mocha: NW55 very cool toned, almost grey undertone
*The colour chart was taken from the following blog:
Beauty with the beautifool
I definitely recommend this product for anyone who suffers from oily, shiny skin!! If you feel you look too matte, do what I always recommend and use a highlighter on your cheekbones, forehead, nose and chin.
I've heard that Estee Lauder Double Wear is really good too and is the more expensive, department store version of this product. One day, I will be trying that out too and I'll let you know. But for now, you can't beat the price or effectiveness of Revlon's Colorstay Foundation for oily/combination skin!!
This foundation has been around forever and ever and ever. When I say forever, I mean it's been around since I was a teenager and all this while I have been searching for the perfect foundation for my incredibly oily skin!!!
Nowadays, it's all about illuminating foundations so a super matte foundation is hard to find. I started to google and read reviews about foundations that work well with oily skin and this came with top reviews. It's a pharmacy brand and in the UK only costs around £12. It's probably even cheaper in the US but it works like no other expensive foundation has ever worked for me. I've been using MAC Studio Fix Fluid for years together with the Studio Fix Powder and that worked well. I only had to blot a handful of times a day. I thought for years that was as good as it was going to get, but as you can see from my excitement, I was wrong!!
So let's go through the pros and cons of this product!!

What the reviewers said:
Pros:
- It finishes matte
- Most oily skin reviewers said they only had to blot about once in the day
- Good coverage, buildable to a full coverage
Cons:
- Smells bad
- Too thick
- No pump and in a glass bottle so the contents don't come out easily
My review:
Smell:
I find the smell to be quite decent. I don't know if they reformulated the product or if i just have a high tolerance for funny smelling products. It's more like a funny smelling perfume to me rather than the smell of plastic or chemicals like many people have said.Texture:
It is a bit thick but in order to make sure it is worked in really well into my skin, I use a kabuki brush to spread it. If you use your fingers, it may come out looking thicker and more cakey.Coverage:
It has a fuller coverage but I wouldn't say it's quite a full coverage foundation. Imperfections are hidden for the most part and my skin looks more flawless than with MAC Studio Fix Fluid. The finish is truly matte which is something my oily skin rarely experiences. |
| I highlighted my nose and cheekbones as a truly matte finish flattens the face out!! |
Lasting Strength:
It does last all day. I have very oily skin so I still have to powder/blot once a day but the oiliness on my face is no where near what it was with my other foundations. I look more glowy but definitely not oily.Colour:
I use Natural Tan which has a neutral undertone. It is probably the best skin match I've ever had. When I use MAC I will mix and NC 42 with an NC45 and use an NC43 powder over that. I found NC42 made me look too white and NC45 too dark. I'm not sure if NC43 is available in the liquid foundation as I've never seen it. I also usually use Missha Perfect BB Cream in 31. I realize now that undertone was not as good a match for my yellow undertone!! |
| Revlon Colourstay Natural Tan on the left and Missha Perfect M BB Cream #31 |
The list below is a guide to your perfect Revlon Colorstay Foundation colour.
Ivory: NW15/ NC15 lightest
Buff: NC20 best match for fair NCs
Sand Beige: NC20-25 somewhat neutral undertones
Nude: NC25 peachy undertones, definitely not for pinks or true golden
Natural Beige: NW20 tends to run pink
Medium Beige: NC27 between Sand Beige and Golden Beige
Fresh Beige: NW25 pinky undertones
Golden Beige: NC30 truest yellow/olive undertones
Warm Golden: NW30/NC30 somewhat neutral undertones
True Beige: NW30 pinky undertones (for Fresh Beige in summer)
Natural Tan: NC40/NC42 more neutral than golden caramel
Early Tan: NW35 somewhat peach undertones
Rich Tan: NW35 pinkish undertones
Golden Caramel: NC40/NC42 more golden than natural tan
Toast: NW43/NC45 neutral undertones
Rich Ginger: NW45 very peachy-pink
Caramel: NC45 seems to run true to color
Cappucino: NC50 slightly more peach than Caramel
Mahogany: NW50/NC55 the darkest of NWs but not extremely peachy
Mocha: NW55 very cool toned, almost grey undertone
*The colour chart was taken from the following blog:
Beauty with the beautifool
I definitely recommend this product for anyone who suffers from oily, shiny skin!! If you feel you look too matte, do what I always recommend and use a highlighter on your cheekbones, forehead, nose and chin.
I've heard that Estee Lauder Double Wear is really good too and is the more expensive, department store version of this product. One day, I will be trying that out too and I'll let you know. But for now, you can't beat the price or effectiveness of Revlon's Colorstay Foundation for oily/combination skin!!
Sunday, October 14, 2012
20 Chin Ups Thanks to Bartendaz Training!!!
Didn't think I'd reach 20 so fast!! Well, maybe half a chin up short!! Gotta reach 20 with pull ups now!!!
Purple and Blue Ombre Effect Floral Nail Art!!

I haven't been using any expensive nail polish from OPI or Nails Inc. Most of my nail polish are from Rimmel!!
Thursday, October 11, 2012
My Polka Dot Nail Art!!!
I received the nail art tools I bought online yesterday and I couldn't resist playing around!!!

Wednesday, October 10, 2012
Something to Think About!!!
My friend shared this on her Facebook page!! I think this is so true!!! Thanks for sharing Cherry Fernandes!!!

Tuesday, October 9, 2012
Week 1 Diet Fail!!!
So it's been just over a week since I started on my 12 week program of trying to eat better and making it to the gym 5 days a week. Unfortunately, week 1 did not go as well as planned.
In terms of the gym, I did make it 4 days in week 1 in which 3 of those days were Bartendaz classes. I had planned to go once more on Sunday, but a long day and a late night on Saturday lead me to sleep in and have a super lazy day. But I'd say 4 is still pretty good. I'm not going to allow myself to feel guilty over 1 less day of gym.
Now, you're probably wondering how I did in the food department!! Well, it was all pretty good until Saturday rolled around. I was at a friend's wedding and I wasn't going to say no to all the delicious food they had ordered.
Here's the damage!!!
*Not shown in the list of photos is my appetizer which was a small fried calamari salad.
Remember I mentioned a cheat meal once a week? Well, a cheat meal should be all I have but this was more of a cheat day!! Not so good!! But again, I think it's important not to feel guilty and not to be overly picky and avoid eating at an event such as a wedding where your friends have put a lot of thought into the meal they have chosen for their guests.
So, I'm not feeling so bad about that but I am feeling bad about the 2 pieces of toast with peanut butter and Nutella on Monday morning. I was just incredibly exhausted and didn't have time to make my eggs and smoked salmon breakfast.
The rest of the day went on better and it's important to just get right back into it when you had a weekend that wasn't so great in the diet department!!
In terms of the gym, I did make it 4 days in week 1 in which 3 of those days were Bartendaz classes. I had planned to go once more on Sunday, but a long day and a late night on Saturday lead me to sleep in and have a super lazy day. But I'd say 4 is still pretty good. I'm not going to allow myself to feel guilty over 1 less day of gym.
Now, you're probably wondering how I did in the food department!! Well, it was all pretty good until Saturday rolled around. I was at a friend's wedding and I wasn't going to say no to all the delicious food they had ordered.
Here's the damage!!!
 |
| The delicious wedding cake. Some kind of strawberries and cream cake. |
 |
| Pastries and scones!!! I had one of each!!! |
 |
| Salmon with pasta for dinner!!! |
 |
| Chocolate brownie without the ice cream for dessert!!! |
Remember I mentioned a cheat meal once a week? Well, a cheat meal should be all I have but this was more of a cheat day!! Not so good!! But again, I think it's important not to feel guilty and not to be overly picky and avoid eating at an event such as a wedding where your friends have put a lot of thought into the meal they have chosen for their guests.
So, I'm not feeling so bad about that but I am feeling bad about the 2 pieces of toast with peanut butter and Nutella on Monday morning. I was just incredibly exhausted and didn't have time to make my eggs and smoked salmon breakfast.
The rest of the day went on better and it's important to just get right back into it when you had a weekend that wasn't so great in the diet department!!
Monday, October 8, 2012
Nail Art!!!
I've never really been big on nail polish. Unlike many girls out there who wear nail polish all the time, I for some reason never really got into it. I think it's because the process of applying and waiting for the polish to dry is a little time consuming.
However, this weekend, I went to a wedding and decided on nude coloured nails as it is the trend this season. On Sunday, I was sitting around relaxing and browsing the Internet and started to YouTube nail art and French tip tutorials. After, I was inspired to do my own nails and decided to go with a contrasting tip on my nude painted nails.
I love the effect of using a sponge to create a contrasting tip and I thought I'd just share the look with you.
I tried to add a little pink flower to my nails as well. Don't know if you can see it that well, but my husband thought it was just a blob of smudged nail polish!! Oh well!!! It was my first time trying some nail art on myself and the first time in months and months that I actually wore nail polish!!
So....what do you think??? If I feel more inspired, I may just include a nail art tutorial. But be reminded, I am no nail art expert. It would just be something for you to relate to...from one completely inexperienced person to the next. No matter how crappy my nails may end up, I have to say, the process of painting the nails with more than one colour and design is actually really fun!!! It reminded me of arts and crafts when I was little!!!
 |
| Contrasting tips!!! |
 |
| A closer look at the blobby looking flower!!! |
More of My Favourite Revlon Lipbutters!!!
Several months ago I went out and bought a whole bunch of Revlon Lipbutter lipsticks and promised to put out a blog so you can check them out. I mentioned that I was waiting for a few more colours to arrive in the mail. I've obviously since received them and they are all incredibly amazing. It's been a few months and all I ever wear these days are my Revlon Lipbutters. They do last surprisingly longer than I expected on my lips depending on what I eat or drink. I still absolutely love the texture and they are incredibly moisturizing. Again, it's like wearing lipbalm, but with the colour intensity of lipstick.
The colours I wanted to share with you are Peach Parfait, Macaron, Candied Apple and Cherry Tart.
For a recap on the general colour, texture and finish of this Revlon range, you can refer back to a previous post ....Revlon Lipbutters!!!! Finally in the UK!!!
Here's a look at the final four I purchased.
Peach Parfait:
A very neutral peachy colour. It's almost nude on my lips but will show up a little more on lighter skinned girls. this is very sheer and very natural.

A great every day colour that can be worn for a nude, natural look or to balance out a pair of smouldering eyes.

Macaron:
A darker shade of Peach Parfait with a hint of terracotta. It's darker but still a very neutral colour. This one would go best with tanned skinned ladies.

It's a great every day colour as well for those wanting a neutral look that is not completely nude. Pairs well with natural eyes.

Candied Apple:
This is a red with a hint of orange in it. It's not quite a deep red, nor is it a very bright red. It's more of a watermelon red.

Pair with natural and neutral eyes. This is great for statement lips and a great evening look.

Cherry Tart:
A deep but sheer red.

This is slightly different than Candied Apple as it is a slightly deeper colour. This one should also be paired with nude eyes and worn for a night out or to achieve a classic polished look. This is great for those who like the red lip look but feel that the red in regular lipsticks appear too opaque and in your face!!!

I don't think Cherry Tart is available in the UK. I looked for it originally but couldn't find it and had my cousin bring mine from the US. They do however, come in 14 shades here in the UK and at £7.99 a pop, you can't go wrong!!!
Wednesday, October 3, 2012
Bikini Photos!!!
For those of you who opened this blog post thinking you were going to get to see a bunch of bikini photos of me... well...you're wrong.
I know there are many conservatives out there reading my blog posts and have probably been shocked that I had put photos of myself in a bikini in my previous post about my weight ups and downs. Well, I just wanted to let you know that the photos were not put up there to parade myself in a bikini for the whole world to see. This is not me, trying to put up sexy photos of myself out of vanity. This is me trying to document my ability to be disciplined and achieve a goal that at my fitness level is incredibly hard to achieve. We see shows about fat people losing weight all the time, but it's much harder for an already fit person to achieve an even greater level of fitness physically and in terms of performance.
If you're opening up the fitness blogs to gawk at my photos, show them to everyone and judge and gossip about how I could even think about putting bikini photos (and/or photos of me in a sports bra) of myself on the Internet then you should be gawking at yourself, telling everyone, judging and gossiping about yourself for being judgmental and for gossiping. From a moral and even a religious standpoint, judgement and gossip is equally as bad if not worse because it involves the feelings of another person.
So, if you opened this blog thinking you were going to get more ammunition for your gossip and judgement, I suggest you re-evaluate your thoughts and your mind. If you can't read the fitness blogs without judgement and gossip then I suggest you don't read it at all until you have become a better and more understanding person!!!! After all, your judgment and gossip are immoral and you wouldn't want to be more or just as immoral as someone who puts bikini photos of themselves on the Internet would you??
Monday, October 1, 2012
A Typical Day in Low Carb Meals!!!
This is the first day of the12 week program I've set for myself so I thought I would share with you what I would normally eat. Keep in mind, I'm not really counting calories. I used to count calories but I'm more or less familiar with roughly how many calories each of my meals has.
Breakfast at 7am

2 eggs scrambled (with yolk) with 2 slices of smoked salmon and a black coffee (no sugar or milk)
Snack 1 at 11am

3 dates (Normally I would have a hand full of unsalted mixed nuts but I forgot to buy some this weekend. I understand that dry fruits like dates and raisins are high in sugar but 3 won't be that bad I suppose. They are high in fibre after all.)
Lunch 1.45pm

Salad with spinach, cherry tomatoes, black olives, cucumbers and chicken breast (cooked in water and curry powder)
Snack 2 at 5pm
3 dates
Dinner 6.30pm

Ground beef, broccoli, carrots, sugar snap peas, onions and mushrooms cooked in light soy sauce and a BBQ chicken thigh (I made a whole pot of this so I'll be eating it most nights this week but I don't usually eat this much red meat. I usually try to cook for the whole week on Sunday and when I made this dish, it slipped my mind that it would mean eating red meat every day!!)
.
It's about 7pm right now and I'm probably going to have a banana and a cup of black coffee. Just for the record, the banana and the dates, although healthy, will probably slow down the fat burn Yes they are healthy but there are other things I can be eating right now that are way more effective for fat loss.
I also usually eat 6 smaller meals rather than 5 small meals. I'll have dinner at work about an hour and a half before the gym and then have a chicken breast or a protein shake after the gym, but I went to the gym at lunch today so I could manage to have an early dinner at home. I don't usually like having dinner past 7.30pm.
Anyway, so there you have it!! It's easier to eat healthy during the work week too. My lunch is so basic and super healthy mostly because it's just so easy to throw a bunch of salad ingredients in a Tupperware. If you can't eat a salad without dressing, then go ahead and add some yourself. I just can't be bothered when I'm preparing mine in the evening. And if you're thinking my bringing lunch to work has to do with the fact it's easier to eat healthy that way, well, you're only half right. London is expensive and I feel that eating out everyday for lunch would be throwing away money that could be spent on other things!!
Today's Bartendaz Workout!!!
Today was a Bartendaz day for me! I went during lunch, which is not something I do every Monday but I really wanted to get a workout in today and get home early.
Lunch hour Bartendaz classes only go for about 40 minutes but for such a high intensity class with little rest throughout, 40 minutes is all you need.
Here's the breakdown of what we did today!!
Chin Ups: 6 reps x 5 sets (alternating with partner)
Pull Ups: 6 reps x 5 sets (alternating with partner)
Military Push Ups: 10 reps x 5 sests (rest time only long enough to switch positions with partner)
Diamond Push Ups: 10 reps x 5 sets (rest time only long enough to switch positions with partner)
Lunges 20 reps (10 on each side) x 3 sets (I have knee problems. Others were doing power lunges)
Squats with Calf Raises 20 reps x 3 sets (Again, others were doing jumping squats)
Flutter Kicks (abs) 10 reps followed by Cycles (abs) 10 reps x 3 sets with no break in between.
Finally we ended with 2 rounds of the following with no break in between:
6 Chin Ups
6 Pull Ups
10 Military Push Ups
10 Diamond Push Ups
15 Lunges
15 Squats with Calf Raises
15 Flutters
15 Cycles
The crazy thing about todays workout was that it was one of the easiest days we've had in a long time!!!
Sunday, September 30, 2012
Big Junk Food Meal!
My big junk food meal before starting back on the healthy eating tomorrow.
My trainer says a one meal a week binge is okay. I'm going to see if I can make it 3 weeks before I cheat.


A Brief Look at the Past, Present and Future...in Body Shape!!!
A look at the ups and downs of the past!!
Over the years, my weight has gone up and down. I don't have any photos at the moment from back in the beginning of June when I was probably the most defined I've been but these are some of the examples of the ups and downs. The aim was always to maintain when I reached my milestone target but as most of you know, when life throws a curve ball at you or in my case, my constant country to country move, it's hard to maintain a routine.
So here's my story!! In year 2 in South Korea (2006), I lost 6 kg in order to be as slim as I could be for my wedding. I did this purely by cutting calories and doing an hour or more of cardio. The result was a slimmer me, but a me that was not very toned. Note to everyone out there, cardio burns muscle so if you do a crap load of cardio, you're burning the muscle you worked so hard to build. It is much easier to burn muscle than it is to gain.

After the wedding in August 2006, I moved to Singapore. I worked with a trainer in the first year in Singapore and he whipped my body into great shape and I was extremely toned. Unfortunately, I have no photos to record this. Over the next 2 years of living in Singapore, I was depressed and proceeded to put on the weight again.

In the middle of 2009, I moved to the Philippines. I traveled a lot during my first year there and continued to put on more weight. I worked out a lot in 2010 but never really controlled my diet. I worked with a trainer but the continuous traveling that year hindered any real results. Finally, in the beginning of 2011, I decided to get serious. I watched what I ate for the most part, making sure I ate on a regular basis but cutting out sugar 90% of the time. I did a lot of cardio and weight training and then discovered Pole Dancing in March that year. That was a turning point for me as I was bored with weights and cardio. My target was to fit into my wedding dress again for my sister's wedding. I met my target and lost 6 kg again.

Where I am today!
My sister's wedding was in July of 2011. Since then I have pretty much maintained at the same weight and lost and gained about a kilo here and there. This is probably just water weight. From October 2011 to April 2012, I did the usual weights and cardio routine as I moved to London and Pole Dancing classes are ridiculously expensive. I managed to maintain but in April I joined the most amazing gym I've ever been a member of. It's called Gymbox. Gymbox lured me in with the fact that it offered not just your usual cardio and weight equipment and fitness classes but it offered boxing, Muay Thai and...you guess it...Pole Dancing!!! I started Gymbox for the Pole Dancing but then discovered Bartendaz and have been a fanatic ever since. Through Pole Dancing, Bartendaz (and with the knee rehab training with my trainer) and a strict low carb diet, by June of 2012 I managed to really shred my obiques and was in the best shape I've ever been. Again, I have no photo record of this. I went to Malta right after this but was incredibly bloated and feeling unwell during the trip so I didn't take any photos on the beach.
So, as I mentioned before, I had a string of vacations and guests and the healthy eating habit had suffered a little. I'm still pretty toned but not as cut as I was a few months back. This is where I'm at now.

My goals!
My goal is to get more toned within the next 12 weeks and get back to where I was before my vacations started. I want to shred my obliques and commit to working out 5 times a week.
However, unlike many I am not motivated by physical appearance. Yes I want that super toned body but thinking about that alone does not motivate me. I'm motivated by strength and my goal is to be able to do 20 strict pull ups/chin ups in a row and 100 push ups in a row. I'm currently at about 12 to 15 chin ups, about 8 to 10 pull ups and 60 push ups. I'm also aiming to perfect some of the pole tricks that I've been struggling with this whole year.
Follow me in the next 12 weeks, motivate me, and share your experience and knowledge with me. As of Monday 1st October 2012 and exactly one year since I've been in London, I'm committing to a body, style and makeup overhaul!!! Feel free to point your finger at me if I start to slack off!!!
Over the years, my weight has gone up and down. I don't have any photos at the moment from back in the beginning of June when I was probably the most defined I've been but these are some of the examples of the ups and downs. The aim was always to maintain when I reached my milestone target but as most of you know, when life throws a curve ball at you or in my case, my constant country to country move, it's hard to maintain a routine.
So here's my story!! In year 2 in South Korea (2006), I lost 6 kg in order to be as slim as I could be for my wedding. I did this purely by cutting calories and doing an hour or more of cardio. The result was a slimmer me, but a me that was not very toned. Note to everyone out there, cardio burns muscle so if you do a crap load of cardio, you're burning the muscle you worked so hard to build. It is much easier to burn muscle than it is to gain.

After the wedding in August 2006, I moved to Singapore. I worked with a trainer in the first year in Singapore and he whipped my body into great shape and I was extremely toned. Unfortunately, I have no photos to record this. Over the next 2 years of living in Singapore, I was depressed and proceeded to put on the weight again.

In the middle of 2009, I moved to the Philippines. I traveled a lot during my first year there and continued to put on more weight. I worked out a lot in 2010 but never really controlled my diet. I worked with a trainer but the continuous traveling that year hindered any real results. Finally, in the beginning of 2011, I decided to get serious. I watched what I ate for the most part, making sure I ate on a regular basis but cutting out sugar 90% of the time. I did a lot of cardio and weight training and then discovered Pole Dancing in March that year. That was a turning point for me as I was bored with weights and cardio. My target was to fit into my wedding dress again for my sister's wedding. I met my target and lost 6 kg again.
Where I am today!
My sister's wedding was in July of 2011. Since then I have pretty much maintained at the same weight and lost and gained about a kilo here and there. This is probably just water weight. From October 2011 to April 2012, I did the usual weights and cardio routine as I moved to London and Pole Dancing classes are ridiculously expensive. I managed to maintain but in April I joined the most amazing gym I've ever been a member of. It's called Gymbox. Gymbox lured me in with the fact that it offered not just your usual cardio and weight equipment and fitness classes but it offered boxing, Muay Thai and...you guess it...Pole Dancing!!! I started Gymbox for the Pole Dancing but then discovered Bartendaz and have been a fanatic ever since. Through Pole Dancing, Bartendaz (and with the knee rehab training with my trainer) and a strict low carb diet, by June of 2012 I managed to really shred my obiques and was in the best shape I've ever been. Again, I have no photo record of this. I went to Malta right after this but was incredibly bloated and feeling unwell during the trip so I didn't take any photos on the beach.
So, as I mentioned before, I had a string of vacations and guests and the healthy eating habit had suffered a little. I'm still pretty toned but not as cut as I was a few months back. This is where I'm at now.

My goals!
My goal is to get more toned within the next 12 weeks and get back to where I was before my vacations started. I want to shred my obliques and commit to working out 5 times a week.
However, unlike many I am not motivated by physical appearance. Yes I want that super toned body but thinking about that alone does not motivate me. I'm motivated by strength and my goal is to be able to do 20 strict pull ups/chin ups in a row and 100 push ups in a row. I'm currently at about 12 to 15 chin ups, about 8 to 10 pull ups and 60 push ups. I'm also aiming to perfect some of the pole tricks that I've been struggling with this whole year.
Follow me in the next 12 weeks, motivate me, and share your experience and knowledge with me. As of Monday 1st October 2012 and exactly one year since I've been in London, I'm committing to a body, style and makeup overhaul!!! Feel free to point your finger at me if I start to slack off!!!
Cut Crease Eyeshadow Tutorial for Asian Hooded Eyes!!!
So, as promised, here is the cut crease makeup tutorial on the look I did last week.
Enjoy!!!

One more thing!!! Don't know if you realized, but I had a hair cut this weekend!!!

I found a wonderful hair salon and hairstylist in London. It's a place called B:Zar. Now I don't have to wait until I return to Singapore for a hair cut. It's a Japanese hair salon and every single stylist in there is Japanese. I find that it's really important for me to have my hair cut by a stylist that understands Asian hair really well, and one that understand Asian trends!! Exactly one year in London and I've found my place!!!
Friday, September 28, 2012
New in Fun With Makeup!!!!
First of all, you may have noticed, the title of my blog has now changed to "Fun with Makeup, Fitness and Life!!!!
Makeup is one of my passions in life. I love playing with makeup, reading up on it, learning about new trends, techniques and products and watching YouTube tutorials, but this is not the only passion in my life.
For those of you who have followed my blog, you've probably seen that I disappeared for a little while after finding a job and joining a new gym. Well, this has lead me to this new addition in my blog!! My other passions in life are fitness and traveling.
I've been going to the gym and getting involved in all kinds of fitness activities since about 2003. I've gone from heavy weight training and cardio, to the high reps high sets type of weight training, to body pump and body combat, boxing and Muay Thai and finally to pole dancing and Bartendaz. My weight has gone up and down over the years and I've never been fat in any way, but I've put on the weight every now and then and become a little curvier and softer from time to time. Keep in mind I'm only 4ft 9in (143cm) tall and a little bit of weight gain is much more noticeable on such a small frame.
About a year ago, before moving to London, I managed to lose 6 kg (13.2 lb). When I came to London in October of 2011, I started to gain some of the weight back and then lost it all again from about April to June. Since June, I've been on several vacations and had a string of visitors which has not been great for my diet or exercise routine. I am in no way back to where I was before the move but I'm really trying to get leaner and more defined.
In order to motivate myself, I figured, writing about it on my blog and committing to it publicly, will really give me a push.
In addition to all that, I'm honestly starting to get tired of slacking off on my work style. I want a style overhaul and I just want to start looking more professional. I want to live by the motto "Dress for the job you want, not the job you have!". So, again, I'm going to motivate myself more by sharing my outfits for work every now and then and I'm welcoming comments and suggestions.
In the mix, I'll share with you some of my travel experiences around Europe as that is really what the move to London was all about!
Stay tuned and I hope you enjoy the new additions!!!
Thursday, September 27, 2012
Cut Crease for Hooded Eyelids!!!
I've always loved a cut crease eyeshadow look. You see this a lot in Middle Eastern and Indian style of makeup. It is such a great look for defining the eyes. For those of you who are unfamiliar with the term 'cut crease', it's basically an eyeshadow look in which the surface of the eyelids is much lighter than the area surrounding it and the separation between the paler eyelid and darker eyeshadow around it is very defined. It's very easy to do if you have deep set eyes and very defined double eyelids. But for us girls with hooded eyelids, the look is harder to achieve and requires several layers of eyeshadow to create an illusion of deep set eyes.
The benefit of a hooded eyelid girl wearing this style of makeup? Well, you guessed it!! It's the usual. This look creates more defined eyes, an illusion of bigger eyes and having well defined double eyelids.
I was playing around with this look yesterday and thought I'd share it with you. But stay tuned for next week's tutorial on how you can achieve this look yourself.


Tuesday, September 25, 2012
Makeup over 50!!!
My mom is visiting me for a month and just like me, she never leaves home without makeup! However, she's been doing the same look day in and day out for years. Unlike many women her age who have not moved on from the makeup they were comfortable with in their 20s and 30s, my mom has moved on and experimented with current colours and products. However, she is reaching a new period in life and a new look is in need.
As young women, we have bright, firm skin and thick, bouncy hair that's full of life and colour. As we age, our hair gets thinner, some of us become grayer than others and women within certain cultures start covering up their heads with a scarf. Many women hide behind their long, luscious hair in their youth, but when you no longer can depend on your crowning glory, it's time to glam up your look with makeup!!!
I'm not saying you should wear more makeup as you age. In fact, less is best in order to look younger. Foundation should remain light and sheer but play up your eyes as they are the most noticeable feature on your face.
Neutral tones are great for keeping the eyes natural, but add a little smokey effect to make your eyes stand out more. As for brighter colours, there is one I believe works for everyone and it's purple. There are so many shades of purple to choose from. They range from pale lilacs for cool skin tones to deep, dark purples for warmer skin tones.
Now, back to my mom!! She is considering embracing the tradition of wearing a head scarf. Without being able to glam up her look with her hair, I suggested wearing a bit more makeup on the eyes!!!! A little goes a long way and I replaced her usual brown or purple eyeliner with black and added a darker corner to her single eyeshadow look. For a natural look, I suggested pairing up MAC Beauty Marked to her usual MAC Trax.
Here's a look at my mom's look before and after.
As you can see, it's still pretty simple but her eyes have a little more pop to them!!
This whole idea of playing up your makeup can be applied whether you are an older woman starting to thin, cover up your hair or you're a young woman who has decided on a short pixie cut and even a shaved head.
When the focus is now mostly on your face, don't be afraid to play it up with makeup!!!
As young women, we have bright, firm skin and thick, bouncy hair that's full of life and colour. As we age, our hair gets thinner, some of us become grayer than others and women within certain cultures start covering up their heads with a scarf. Many women hide behind their long, luscious hair in their youth, but when you no longer can depend on your crowning glory, it's time to glam up your look with makeup!!!
I'm not saying you should wear more makeup as you age. In fact, less is best in order to look younger. Foundation should remain light and sheer but play up your eyes as they are the most noticeable feature on your face.
Neutral tones are great for keeping the eyes natural, but add a little smokey effect to make your eyes stand out more. As for brighter colours, there is one I believe works for everyone and it's purple. There are so many shades of purple to choose from. They range from pale lilacs for cool skin tones to deep, dark purples for warmer skin tones.
Now, back to my mom!! She is considering embracing the tradition of wearing a head scarf. Without being able to glam up her look with her hair, I suggested wearing a bit more makeup on the eyes!!!! A little goes a long way and I replaced her usual brown or purple eyeliner with black and added a darker corner to her single eyeshadow look. For a natural look, I suggested pairing up MAC Beauty Marked to her usual MAC Trax.
Here's a look at my mom's look before and after.
 |
| Before |
 |
| After |
 |
| Mom's efforts on her own!!! |
As you can see, it's still pretty simple but her eyes have a little more pop to them!!
This whole idea of playing up your makeup can be applied whether you are an older woman starting to thin, cover up your hair or you're a young woman who has decided on a short pixie cut and even a shaved head.
When the focus is now mostly on your face, don't be afraid to play it up with makeup!!!
Friday, September 14, 2012
Covering Acne with Makeup!!!
I was browsing through yahoo yesterday and came across an article about a teenager in the US who was signed up to model during New York Fashion Week.
She had been bullied in school because of her acne and was given all sorts horrible nicknames. However, this young girl is incredibly talented and her Youtube video on how she covers up her problem skin received millions of hits. It also got her noticed and landed her in New York Fashion Week.
After reading the article, I felt that I had to share it on my blog. At the end of the article is a link to her Youtube video. Her skills in covering problem skin far exceeds mine and for those of you looking for a great tutorial on covering acne and scars, this is the best I've seen so far.
Click on the link below to read the article and watch the video.
http://uk.lifestyle.yahoo.com/teen-bullied-for-acne-has-last-laugh-as-she-models-at-new-york-fashion-week.html
Benefit Pore Professional Review!!
A few months ago, I bought a Glamour magazine that included a free sample of Benefit Cosmetic's Pore Professional. I've been using it every day since then and have been meaning to write a review on it.

For those of you who are unfamiliar with this product, it's a pore minimizer and claims to reduce the appearance of pores and fine lines. How do you use it? Well, this product goes on after your moisturizer and before or after foundation. I tried it both ways and I find it works better under foundation as it has a little bit of colour and when applied under, blends with my foundation better. For those of you with skin tones that match the colour of the pore minimizer, it may work just as well if you apply it over your foundation. You only need to apply it to the areas of your face where your pores are the most noticeable. For me, those are my cheeks and T-zone.
To be honest, I haven't really experimented with pore minimizers much but in the past have tried a sample of Clinique's pore minimizer. I was never a fan of the Clinique product as the texture was a bit thick and the colour was way too light for my complexion.
In contrast to that, Benefit's Pore Professional has a more natural colour that blends into my skin nicely. It's almost unnoticeable and when applied under foundation, just disappears. It has a very light texture that feels very smooth when applied to the skin. The first time I applied it to my T-zone and upper cheeks, I thought it might be a little greasy and was a bit concerned as I have oily skin. However, when I completed my look, I did notice that my pores really did appear to be less noticeable and my skin looked more even in texture. It also mattified my complexion without giving it a dull look.
How does it hold up throughout the day? Well, I am pleasantly surprised that day after day, in both cold and hot weather, this pore minimizer has proven itself. At the end of a work day, my makeup is still in tact, non-greasy and my pores are still less noticeable. I do have fairly large pores especially on my nose so for those of you with even less noticeable pores, this product will perform even better. Having said all that, don't expect your skin to look like it has been airbrushed and photo shopped. It does even out the texture but you won't look completely pore-less!!!
The little thumb size sample has lasted me several months so the full sized tube should last through the year. You only need a little bit at a time. An amount the size of half a hole punched piece of paper is all you need for your cheeks and T-zone.
I'm just about done with my sample and ready to purchase a full sized tube.
Wednesday, September 5, 2012
Red Lipstick Quick Tip!!
Hi everyone!!! Last time, I mentioned I was going to try to be more diligent about putting up a post at least once a week, but I apologize for not having kept to that promise. Again, my routine has been turned upside down with a string of guests visiting me from overseas. Don't get me wrong, I love visitors but it has been hard to find some time to write and play with makeup!!!
This morning, I was getting ready for work and as I've mentioned in previous posts, when I've hit snooze on the alarm clock way too many times and I just don't have a lot of time to get ready, I like to keep it simple with one eyeshadow colour on my eyes and a brighter lipstick to create a more polished look.
Today, I felt like using my MAC Red lipstick. This is a really thick and heavy lipstick that is more suitable for an evening look. It's an intense red and is one of those lipsticks that requires soap and water to remove unless you want to go to bed looking like the the Joker from the Dark Knight.
In order to make the lipstick appear less intense for a daytime look, instead of applying it the way I usually do, by running the lipstick across my lips, I dabbed the colour on instead. You don't need to use your fingers to dab the colour on, just dab the lipstick directly onto your lips.
The layer of lipstick on your lips will be thinner and the look will be more sheer than if you applied your lipstick the usual way. This is a great way to apply a more intense colour without your lips looking like you've got too much lipstick on.
So next time you're drawn to a dramatic lipstick colour, don't steer clear of it. Try dabbing it on for a more natural finish!!
Sunday, June 10, 2012
Bronze Summer Look
Summer is here (well, in some parts of the world except for the UK) and there's nothing better than soaking up the sun and ridding yourself of that pale winter skin. If you live in a place, like the UK, where summer doesn't necessarily mean warm weather and sunshine, there's always makeup to fake a beautiful, flushed, summer look.
When I say faking a a summer look, I'm not talking about a fake tan. All you need to get that summer glow are the right eyeshadow colours and a bronzer to replace your usual blusher.
Use bronze or rust coloured eyeshadows with some browns that have a bit of shimmer and definitely use a bronzer on your cheeks. These colours will give you a very natural look. Summer makeup should always be light and natural.
My favourites for the summer are MAC eyeshadow in Mythology paired with MAC eyeshadow in Mulch. Use Mythology as your main colour. Mulch, as it is the darker of the two, should be used on your corners. Blend the colours out really well as you want them to look as natural as possible. Go easy on the eyeliner and opt for a pencil liner on the upper lashline only. Naturally enchance your bottom lashline by adding mascara to the bottom lashes.
As for your bronzer, use it on your cheeks as you would with your blush but brush just a teeny tiny bit of it on your chin, nose and forehead. This will give you a beautiful summer glow. I'm using MAC Bronzer in Refined Golden.
Opt for a terracotta shade of lipstick or something peachy to complement the look. I'm using Revlon Lipbutter in Macaron.
Important Tip:
Don't over do the bronzer as you can appear too have too much of a fake tan. Applying it all over your face like you would a powder will give you an overly bronze look or make your face look dirty.

Thursday, June 7, 2012
+ 3 Month Estee Lauder Advanced Night Repair Review
I just wanted to update everyone on my progress with the Estee Lauder Advanced Night Repair serum.
After two months of using the product, as you have probably read from my 2 month review, I saw my fine lines fading more although they did not disappear completely.
I've just finished my first bottle after a little over 3 months of use in total and the difference between month two and month three was not that significant to tell you the truth. I do feel my skin is a lot smoother and the lines are not as deep but they are still there. I am not attaching a photo to this post as I don't feel the changes will be noticeable.
So, you're probably wondering if I recommend this product and whether I've gone into my second bottle. Well, I did. I recently purchased a new bottle and will continue to use this product. Why you may ask? Well...if you're looking for a product that will get rid of your wrinkles and fine lines completely, this is not the product for you but I love how my skin feels now that I've been using it for some time and the fine lines have definitely become more shallow. My skin tone is so much more even and my skin is much softer. It does overall look a lot smoother too. It's given me a healthier glow and who knows, in a few more months, there may be even more changes.
For those of you looking to even up your skin tone, diminish your fine lines and improve the overall texture and look of your skin, this is a fabulous product.
However, if you are looking for botox-like effects on your fine lines and wrinkles, this is not the product for you. You're probably better off with botox.
Remember, when you do try a new product, give it a few months before you really decide on whether it was worth it or not. Results don't usually appear out of the blue. With anything, it does take time, so be patient and don't just give up on it right away. If in about 2 - 3 months it hasn't done anything at all, then you can be assured, it hasn't worked for you.
I've got a few more posts coming your way soon after a bit of a hiatus, so please stay tuned!!
Friday, April 27, 2012
Apologies for Incorrect Colour Listed in My Previous Post!!!
Hi Everyone!!!
I just wanted to apologize for listing an incorrect colour name for the blue eyeshadow I used in the previous blog post. It's MAC eyeshadow in Blue Edge...NOT...Satellite Dream!!!!
I just wanted to apologize for listing an incorrect colour name for the blue eyeshadow I used in the previous blog post. It's MAC eyeshadow in Blue Edge...NOT...Satellite Dream!!!!
Wednesday, April 25, 2012
Themed Makeup Look!!!
This past weekend, I volunteered to cheer for the Prostate Cancer Charity and Breast Cancer UK London marathon team. It was a fantastic day out and the runners were so inspirational. The two charities were the main recipients of the proceeds of the race but they also had about 800 runners on their team, specifically raising money for them.
So, to make things more lively and keep with the branding of the two charities, the theme of the day was to dress in the charity colours, pink and blue. In addition to my pink and blue Sketchers and attire, I decided to stick to the theme with my makeup as well and I wanted to share this look with you.
Pink and blue are very contrasting colours but I find they can be worn together for an everyday look. It's not just appropriate for a fun event, but works for work as well if you feel like brightening up your look.
As you can see, the overall look is incredibly natural. For those of you who have been keeping up with my blog, you know I'm all about more subtle looks unless its a big night out.

The application technique:
After applying the pink colour all over your lids, apply the blue shadow on the corners but in a half almond shape in order to give your eyes an illusion of being.....well..... more almond shaped.

Blend out just the harsh edge at the top. In order to give it a faded effect up to your brow bone, apply your highlighter to your brow bone and blend it into the harsh edge of the blue shadow. To make the pink on your eyelids stand out more, just apply a little more just on the eyelid, going no further up than your crease.

Finish off with your eyeliner of choice and mascara.
What I used on my eyes:

Blue: MAC eyeshadow in Satellite Dream
Pink: MAC eyeshadow in Sushi Flower
Highlighter: Kryolan eyeshadow in white (MAC eyeshadow that works great is Vanilla)
One more thing...this look goes really well with a light pink lipstick. I used my Revlon Lipbutter in Cupcake.
So, to make things more lively and keep with the branding of the two charities, the theme of the day was to dress in the charity colours, pink and blue. In addition to my pink and blue Sketchers and attire, I decided to stick to the theme with my makeup as well and I wanted to share this look with you.
Pink and blue are very contrasting colours but I find they can be worn together for an everyday look. It's not just appropriate for a fun event, but works for work as well if you feel like brightening up your look.
As you can see, the overall look is incredibly natural. For those of you who have been keeping up with my blog, you know I'm all about more subtle looks unless its a big night out.

The application technique:
After applying the pink colour all over your lids, apply the blue shadow on the corners but in a half almond shape in order to give your eyes an illusion of being.....well..... more almond shaped.

Blend out just the harsh edge at the top. In order to give it a faded effect up to your brow bone, apply your highlighter to your brow bone and blend it into the harsh edge of the blue shadow. To make the pink on your eyelids stand out more, just apply a little more just on the eyelid, going no further up than your crease.
Finish off with your eyeliner of choice and mascara.
What I used on my eyes:

Blue: MAC eyeshadow in Satellite Dream
Pink: MAC eyeshadow in Sushi Flower
Highlighter: Kryolan eyeshadow in white (MAC eyeshadow that works great is Vanilla)
One more thing...this look goes really well with a light pink lipstick. I used my Revlon Lipbutter in Cupcake.
Subscribe to:
Posts (Atom)